データ取得
本章の概要
この章の終わりには、デバイスで次のようなことができるようになります。
- 電源をオンにしてローカルのスマートサーモスタットアプリケーションを起動する
- 検出された現在の温度、測定された雑音レベル、HVAC の状態 (heating、cooling、standby)、在室状況のインジケーターを使用してログにパブリッシュする
Core for AWS IoT Kit リファレンスハードウェアキットには、すぐに使用できるセンサーが複数付属しています。このソリューション用に、ローカルのアプリケーションコードを使用した温度センサーとマイクから読み込みを実行します。アプリケーションはセンサーの読み込みと、ディスプレイに概要を表示するため使用される状態のフラグを追跡し続けます。
サーモスタットアプリケーションのプログラミング方法
スマートサーモスタットは統合されたセンサーをサンプリングします。これには、すでに作成され、バンドル化されたソフトウェアコンポーネントに含まれている実装が使用されます。最初のステップでは、AWS IoT Core までのセンサー値のパブリッシュに移る前に、値をキャプチャしてロガーにプリントアウトするだけです。
含まれている MPU6886 モジュールの温度センサーから読み込むのは簡単です。以下はコードスニペットです。
// include libraries for interfacing with the kit's modules
#include "freertos/FreeRTOS.h"
#include "core2forAWS.h"
#include "mpu6886.h"
#include "esp_log.h"

// the application to run on the device
void app_main()
{
  // initialize a float to store our temperature reading
  float temperature = 0.0f;

  // initialize the kit modules
  Core2ForAWS_Init();
  MPU6886_Init();

  // read from the temperature sensor
  MPU6886_GetTempData(&temperature);

  // convert the reading to Fahrenheit and apply a calibration offset of -50
  temperature = (temperature * 1.8)  + 32 - 50;

  // write the value to the ESP32 logger
  ESP_LOGI("thermostat", "measured temperature is: %f", temperature);
}
このコードを使用してデバイスログをビルド、フラッシュ、モニタリングした場合、デバイスは温度センサーから1回読み込みを実行し、ロガーに書き込み、停止します。他のプロセスをブロックすることなく毎秒のサンプルを継続的に取得する場合、個別の ** FreeRTOS タスク **を作成し、MCU コアにピン付けします。以下を参照してください。
#include "freertos/FreeRTOS.h"
#include "freertos/task.h"
#include "core2forAWS.h"
#include "mpu6886.h"
#include "esp_log.h"

// store our application logic in a task function
void temperature_task(void *arg) {
  float temperature = 0.0f;

  // loop forever!
  for (;;) {
    MPU6886_GetTempData(&temperature);
    temperature = (temperature * 1.8)  + 32 - 50;
    ESP_LOGI("thermostat", "measured temperature is: %f", temperature);

    // sleep for 1000ms before continuing the loop
    vTaskDelay(1000 / portTICK_RATE_MS);
  }
}

void app_main()
{
  Core2ForAWS_Init();
  MPU6886_Init();

  // FreeRTOS concept: operations that run in a continuous loop are done in tasks
  xTaskCreatePinnedToCore(&temperature_task, "temperature_task", 4096, NULL, 5, NULL, 1);
}
スマートサーモスタットファームウェアのコンパイルとアップロード
VS Codeと PlatformIO 拡張機能を使用してデバイスにビルドおよびアップロードするためのサンプルアプリケーションが既に準備されています。VS Codeで既に開いている他のプロジェクトがある場合は、まず新しいウィンドウ(ファイル→新しいウィンドウ)を開き、ファイルエクスプローラと作業環境をクリーンにします。
このチュートリアルでは、Smart-Thermostat プロジェクトを使用します。新しいVS Codeウィンドウで、
- VS Codeアクティビティバー(左側のメニュー)の PlatformIOロゴ をクリック
- 左の PlatformIO メニューから Open を選択
- Open Project をクリック
Core2-for-AWS-IoT-EduKit/Smart-Thermostatフォルダに移動し、openをクリックします。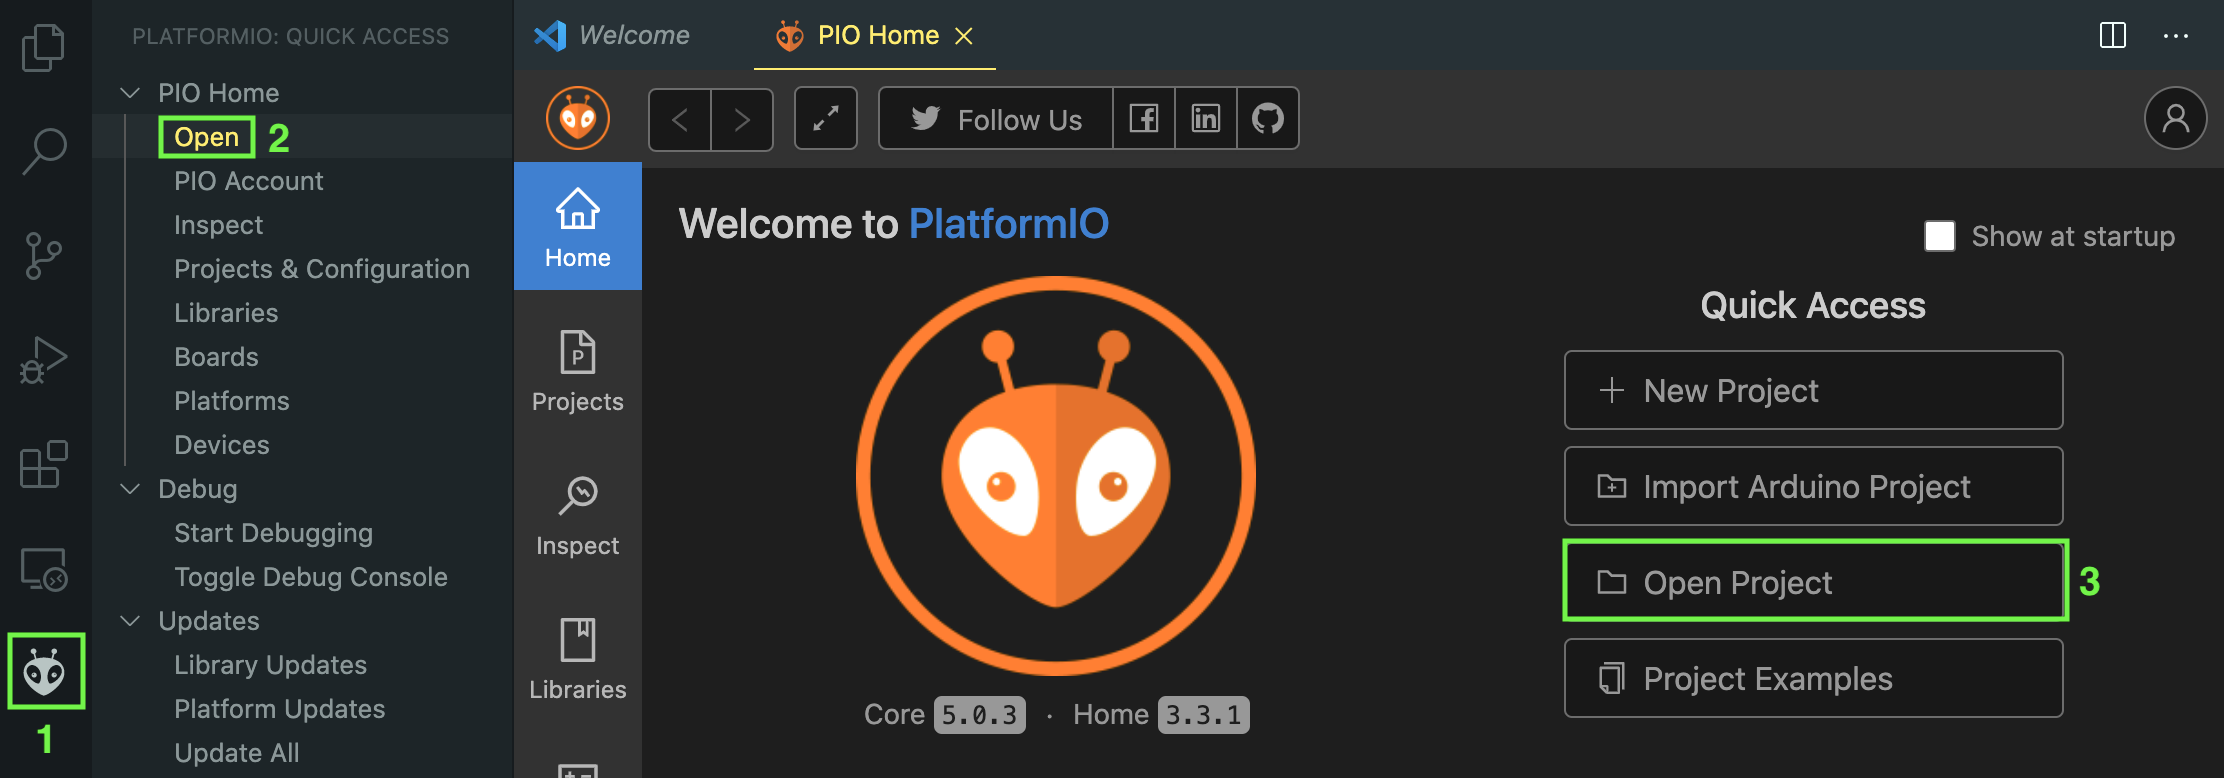
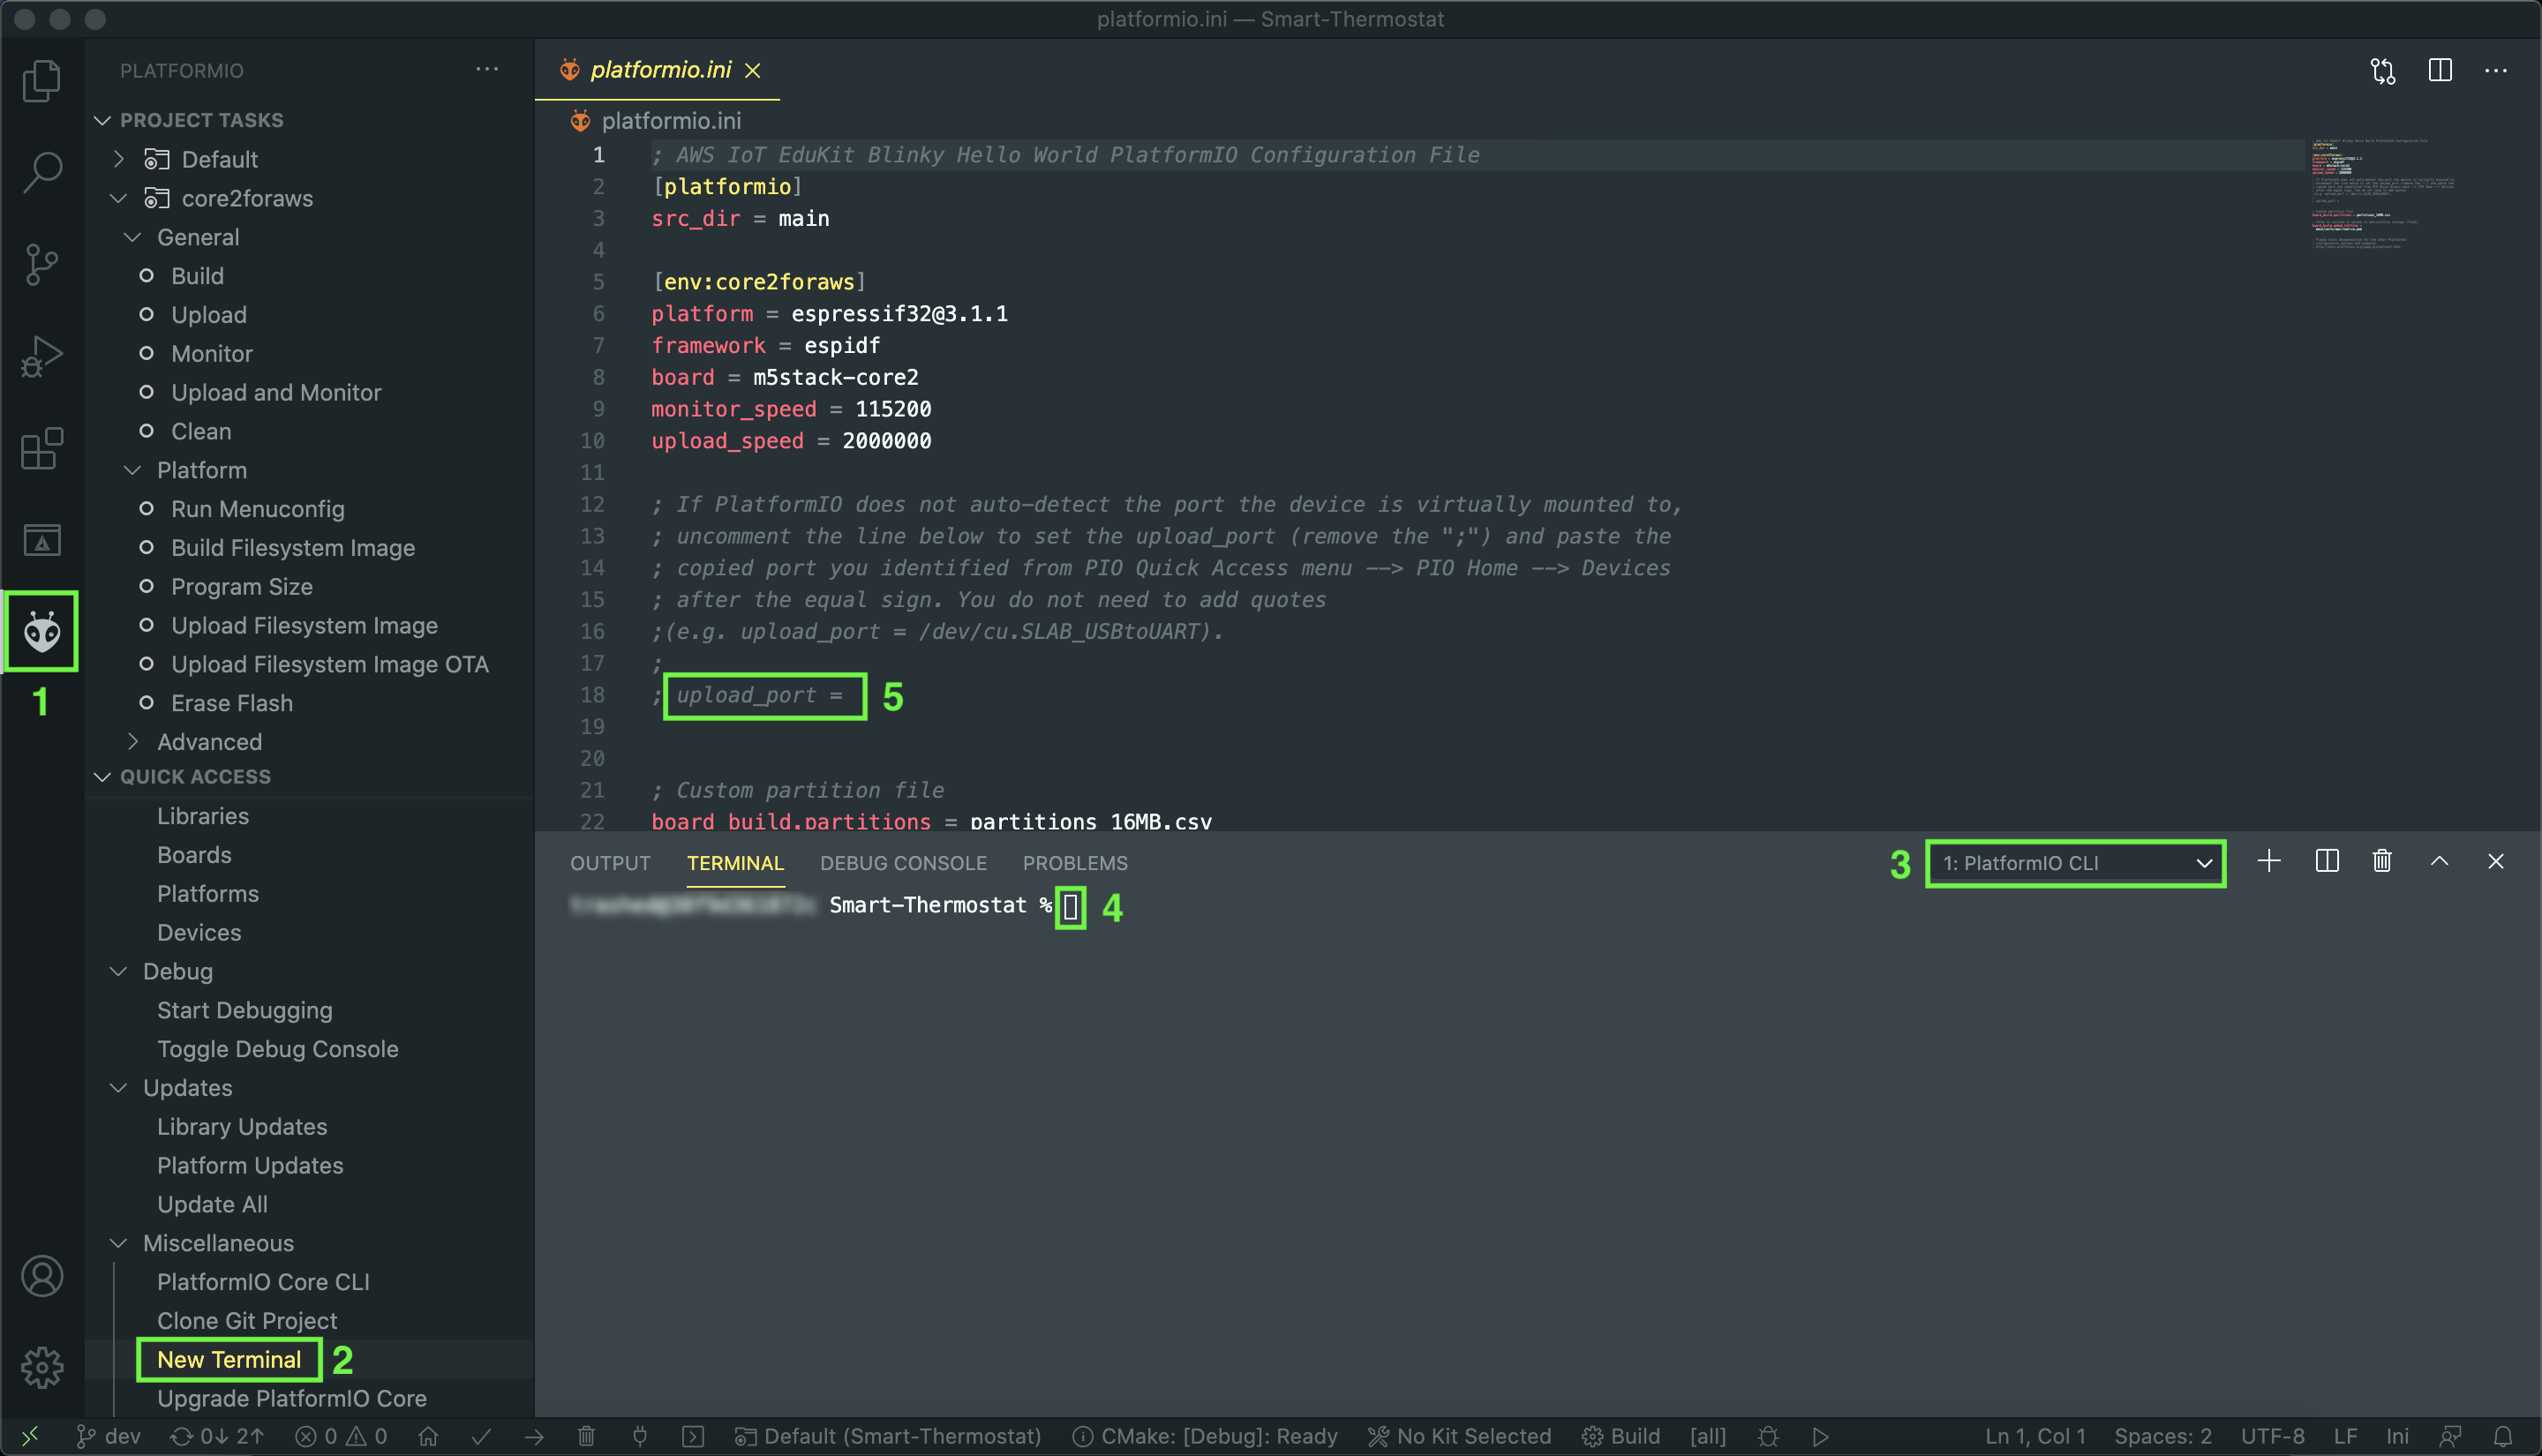
次に、新しくPlatformIO CLIターミナルウィンドゥを開きます。
- VS Codeアクティビティバー(左側のメニュー)の PlatformIOロゴ をクリック
- Quick Access メニューの、Miscellaneous にある New Terminal をクリックしてターミナルを開きます。PlatformIO CLIというラベルが付いたターミナルが開くはずです
「Lチカ」 プロジェクトから設定をコピーし、デバイスファームウェアをコンパイルしてデバイスにアップロードするには、以下のホストマシンの OS のステップに従って、作業を進めます。
検証ステップ
次の章に進む前に、デバイスが想定どおりに設定されているかを検証できます。
- Core2 for AWS IoT Kit の電源がオンになっていてアプリケーションが実行されている場合、ターミナルウィンドウのログに次のような表示が確認できます
I (16128) MAIN: On Device: roomOccupancy false
I (16132) MAIN: On Device: hvacStatus STANDBY
I (16137) MAIN: On Device: temperature 64.057533
I (16143) MAIN: On Device: sound 8
想定どおりに機能している場合は、「 データ同期 」に進みましょう
Questions? Please use AWS re:Post
AWS IoT Kit now features direct access to
AWS re:Post
, which is a community-driven, questions-and-answers service. Search re:Post using the
AWS IoT Kit
tag to see if your question has been asked and answered. If not, ask a new question using the AWS IoT Kit tag.